The issues
If you are an iOS developer, you might be familiar with in-app-purchases (IAP). You can provide additional content or services within the app, such as buying clothes for your character, unlocking new features in your app, removing ads, etc. However, it will be hard for you to track the status of the IAP, handle refunds, and manage the subscriber status. We will have some cases like this:
- You have a newspaper app. User only bought your premium content to remove the ads, then he asks for a refund.
- You have a business app, then the user pays for “Gold pack”, that adds 500 coins to his wallet inside your app. Then he asks for a refund.
You can clearly see that mobile can handle (A) without any problem. However, it will be an issue in case (B). Your server will not know about the “refund” event of customer, and we cannot deduct the correlative coins of the user when the “refund” is approved by Apple.
The approach
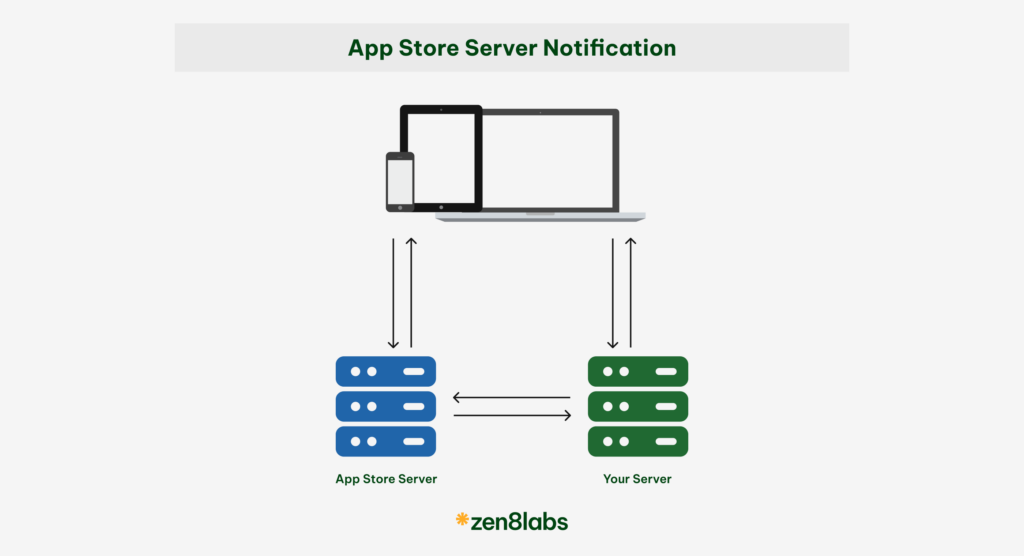
In zen8labs, we are also handling this kind of issue. This article will show you how to handle server-to-server notifications of Auto-Renewable Subscriptions to stay informed about the user’s subscription status using the latest official Python library provided by Apple.
- You will need to prepare a URL to receive the notification from Apple (for example: https://yoursite/receive-apple-notification)
- We will need to enable Server-to-Server Notification in app store connect, and put the URL prepared in (1):
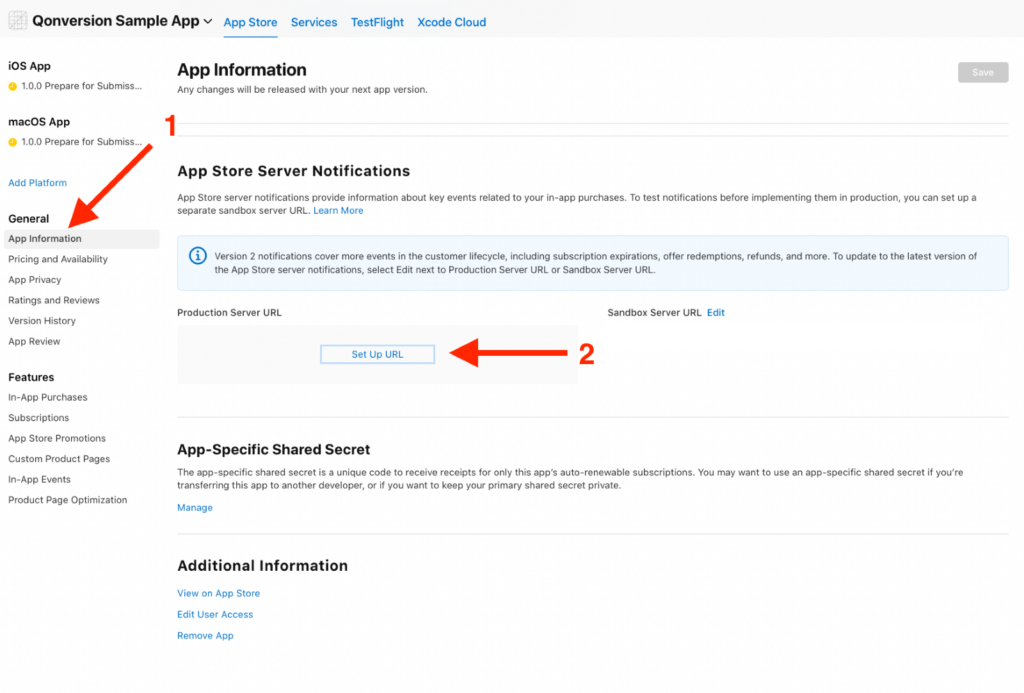
That is simple, isn’t it? No, this is where everything begins. You will need to put your effort on (1) – Prepare and endpoint to receive the notification from Apple.
Each time there is a change from our in-app purchases, Apple will send data to the URL that we prepared. First, we will need to get familiar with the request body from Apple
Request body
{
"signedPayload":" eyJhbGciOiJFUzI1NiIsIng1YyI..."
}
This payload is signed by App Store, and it contains a lot of data that we will need to process. We will need to decode it to get the information we want.
In the past, we will need to decode the signedPayload using some steps, and a lot of knowledge need to be acquired by us to get the info we needed, like this:
- Extract header from the JWS token (Algorithm: ES256, Token type: x5c).
- Verify the header with an app store key (Apple Root CA — G3 Root).
- Extract the public key from the token to parse the payload data.
- Parse payload to our data structures (pre-defined in our source code).
Nevertheless, thanks to the latest official Python library from Apple, this process is now much simpler. You can follow the steps below to decode it.
1. Obtaining an In-App purchase key from app store connect

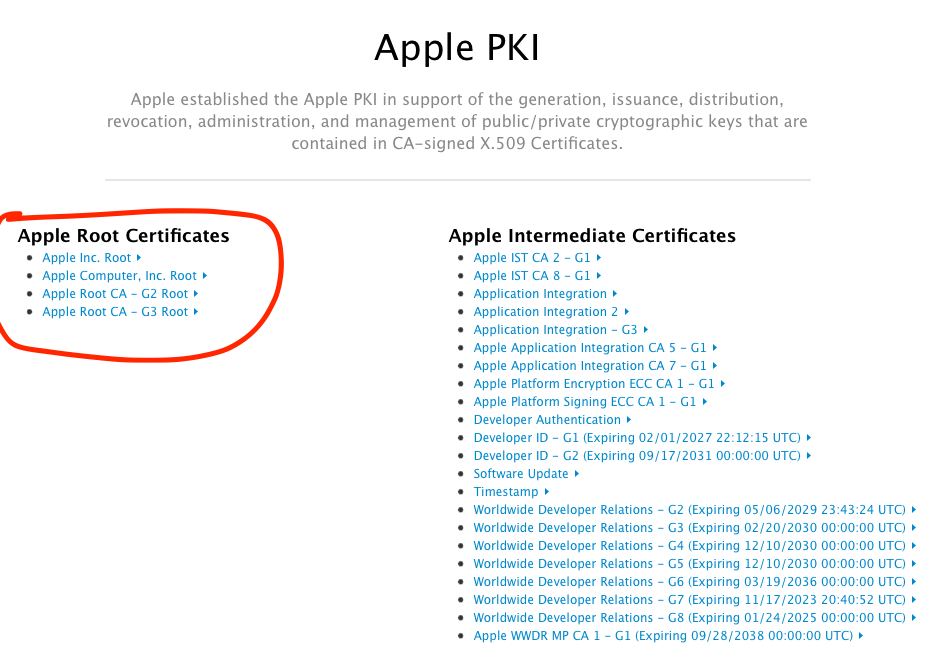
2. Download the apple root certificates: you will need to download all 4 certificates from Apple PKI.
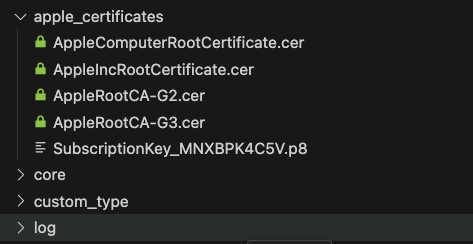
3. You will need to put the certificates and the. p8 file into a folder in your source code, like this
4. We will define some methods to help decoding the signedPayload from Apple
def load_root_certificates():

file_names = [

"AppleComputerRootCertificate.cer",

"AppleIncRootCertificate.cer",

"AppleRootCA-G2.cer",

"AppleRootCA-G3.cer",

]

cert_list = []

path = str(settings.BASE_DIR) + "/apple_certificates/"

for file_name in file_names:

  cert_file_path = path + file_name

with open(cert_file_path, "rb") as f:

  cert_list.append(f.read())

return cert_list

def get_app_store_server_api_client():

private_key = NewAppStorePurchaseHandler.read_private_key("SubscriptionKey_MNXBPK4C5V.p8")

key_id = "your_key"

issuer_id = "your_issuer_id"

bundle_id = "your_bundle_id"

environment = Environment.SANDBOX

return AppStoreServerAPIClient(private_key, key_id, issuer_id, bundle_id, environment)

def get_signed_data_verifier():

  root_certificates = NewAppStorePurchaseHandler.load_root_certificates()

  enable_online_checks = True

  app_apple_id = 6475540146

  bundle_id = "com.sixtyapps.serveclub"

  environment = Environment.SANDBOX

signed_data_verifier = SignedDataVerifier(

root_certificates, enable_online_checks, environment, bundle_id, app_apple_id

)

return signed_data_verifier
5. After that, we will decode the signedPayload from Apple
@transaction.atomic

def receive_apple_notification(self, request, *args, **kwargs):

  signed_data_verifier = AppStorePurchaseHandler.get_signed_data_verifier()

  signed_payload = request.data.get("signedPayload")

  try:

    decoded_payload =    signed_data_verifier.verify_and_decode_notification(signed_payload)

    if decoded_payload.data.signedTransactionInfo:

      decoded_signed_transaction = signed_data_verifier.verify_and_decode_signed_transaction(

decoded_payload.data.signedTransactionInfo

)

  if decoded_payload.data.signedRenewalInfo:

    signed_renewal_info = signed_data_verifier.verify_and_decode_signed_transaction(decoded_payload.data.signedRenewalInfo)

except VerificationException as e:

print("failed")

print(e)

return Response({})
We can access to properties of “decoded_payload” – responseBodyV2DecodedPayload, like described here.
With zen8labs use case, we need to pay attention to some main properties (in your case, it might be different depends on your purpose)
- notificationType: the type of notification sent by Apple
- subtype: additional information that provides more information to the “notification Type” property.
- data: it includes lot information, however in scope of this article, we only focus on decoding data from Apple, so we will only need to care about these fields:
- signedRenewalInfo: containing renewal info in JWS format. After decoding, we will have an object in JWSRenewalInfoDecodedPayload format.
- signedTransactionInfo: containing transaction info in JWS format. We will have an object in JWSTransactionDecodedPayload format.
- appAccountToken: this is the information that will need to be sent from the client, and normally it will be our user id. This info is very important, since it will help us to determine which user will need to be updated on the backend side.
- transactionId: the id of the transaction
- originalTransactionId: the initial transaction id
… and a lot of information is waiting for you to explore.
Depending on the notificationType, subtype, appAccountToken (normally the user id) and other information, we can decide what will be updated for our user. Back to our example above, when user pays for “Gold pack”, that adds 500 coins to his wallet inside your app. He is asking for a refund, so we will receive the information from Apple:
- notificationType: REFUND
- appAccountToken: the user id
You can look up in your database, find the corresponding user using the user id, then subtract 500 coins from his wallet.
Conclusion
That’s it for today. Hope you can understand how we can decode the signedPayload from Apple and use the information on the server using the Python library from Apple. You can refer notificationType to see which case(s) are covered by App Store server notification and decide what to do with your user data after receiving the notification.
If you have any feedback, feel free to contact zen8labs.
