At zen8labs, we’re passionate about building robust and reliable mobile applications that exceed our client’s expectations. To achieve this goal, we’ve carefully evaluated different design patterns available in Flutter, including BloC and Redux. While these patterns have their pros and cons, we ultimately chose MVVM with RxDart on Flutter projects for several reasons.
- As mobile developers, most of us are already familiar with MVVM. This allows all team members to quickly learn and apply the pattern.
- We wanted to create an architecture that was independent of third-party libraries or frameworks, reducing our reliance on external updates or changes. By developing our own architecture, we can ensure that our codebase remains stable and reliable across different platforms.
- We love reactive programming and believe it’s the perfect complement to MVVM, especially for data transformation and two-way bindings. Thanks to the Rx community for supporting the most common languages, we can develop a single architectural style that works across iOS native, Android native, Flutter, and React Native. This saves us time when switching between projects and ensures consistent communication and collaboration across different platforms and projects.
In short, using MVVM with RxDart has helped us streamline our development process, made our code more reliable, and managed complex data flows more efficiently. If you’re interested in learning more about how we use this pattern, keep reading!
The idea of using MVVM with RxDart
Before we begin, let’s take a look at a simple function:

This function takes arguments ‘a’ and ‘b’ as input, does something inside, and finally returns a result as output. We can break down the above function into three components:
- Input
- Output
- Calculation/transformation logic
However, if we think about any business logic in an abstract way, we can see the same structure with the above function. Any logic always operates on inputs and produces results. In theory, we can describe any logic as a transformation of input data using the following formula:
Output = f(input)
If you are already familiar with Rx, it is a perfect tool for data transformation because Rx operators handle most of the heavy stuff. Based on this idea, we use Rx as a tool for data transformation and two-way binding, and we design our ViewModel (VM) to precisely represent the above formula.
The structure
Now, let’s dive deeper into the structure of MVVM.
We all know MVVM is something like this, right?
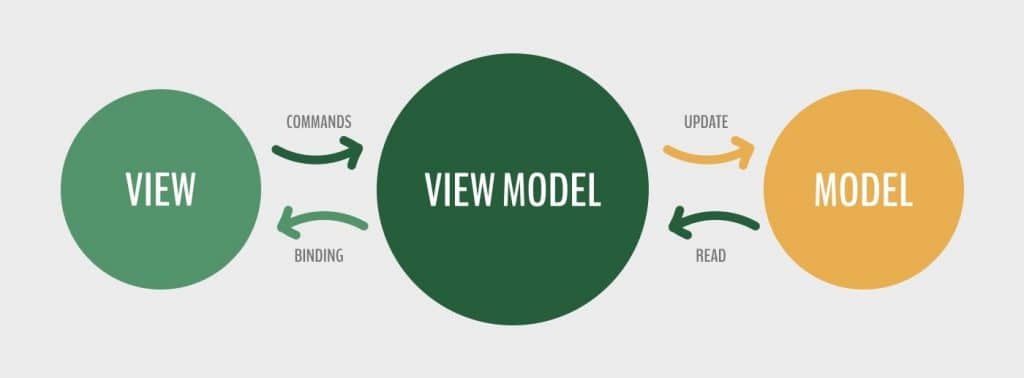
There is nothing wrong with it, but it does not clearly explain what happens inside the ViewModel. Therefore, at zen8labs, we often describe our MVVM as follows:
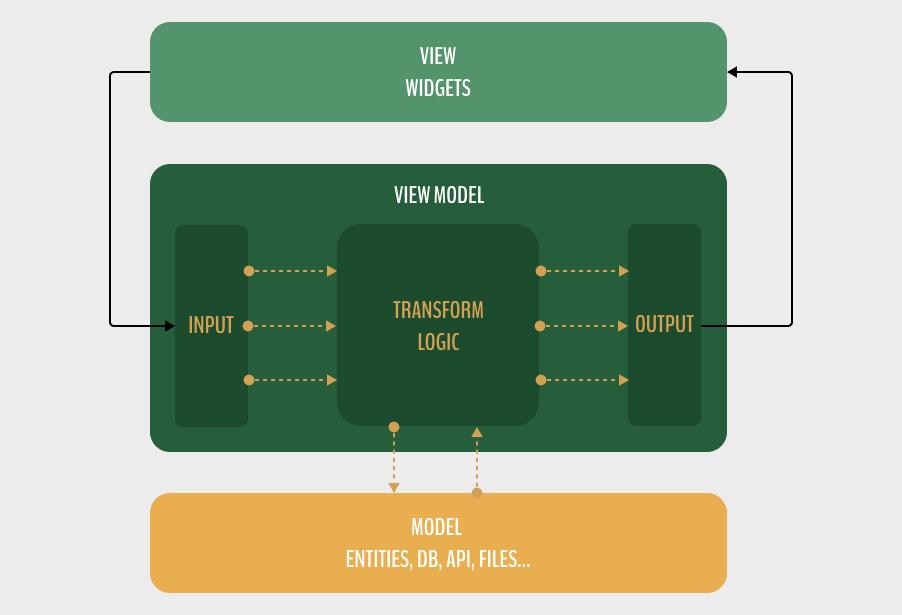
In this post, we will not be focusing on the View and Model layers, as they are already clear and simple. There is no difference compared to other MVVM implementations that you can find on the Internet. Instead, we will focus on the implementation of the ViewModel.
- Inputs are the data that our ViewModel needs to transform. These can include user interactions, such as tapping on a button, inputting text into a search bar, or triggering an action when the user pulls down to refresh.
- Outputs are the results of the transformation performed by our ViewModel. We can update these to the UI, such as a list of posts or content that prompts an alert or toast. Outputs can also include triggers to navigate to another screen after completing certain tasks.
- The transformation logic is essentially a single transform function where we utilize Rx operators to perform necessary transformations.
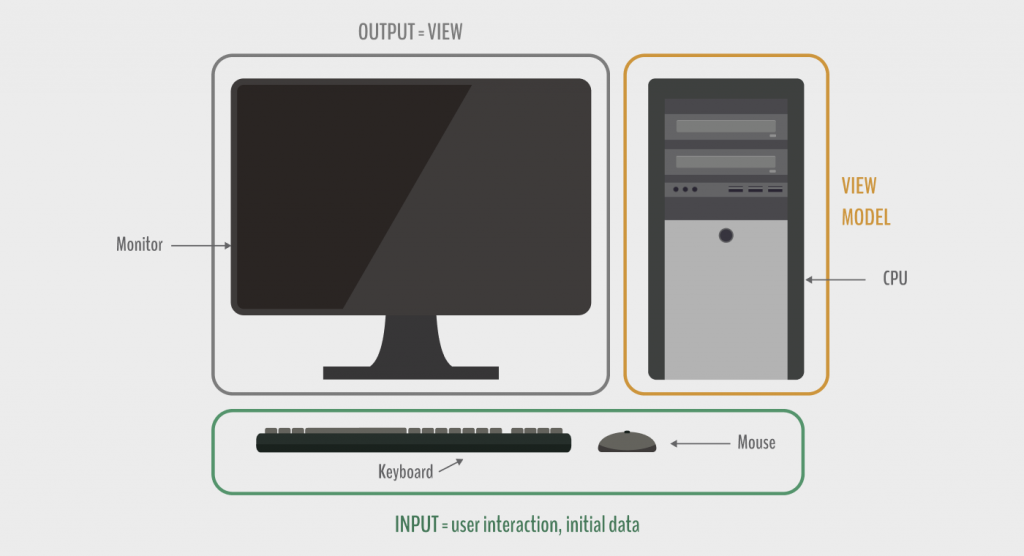
To make it easier to imagine, you can think of the ViewModel as a CPU that processes input data and events from the keyboard, mouse, and other sources and displays the results on the screen.
Now, let’s move on from the theoretical aspects and dive into the implementation part.
The implementation
Let’s start with the Disposable interface, which allows us to dispose of all resources once we are finished using them.

Next, let’s define the base view model, which serves as the base class for all of our view models.
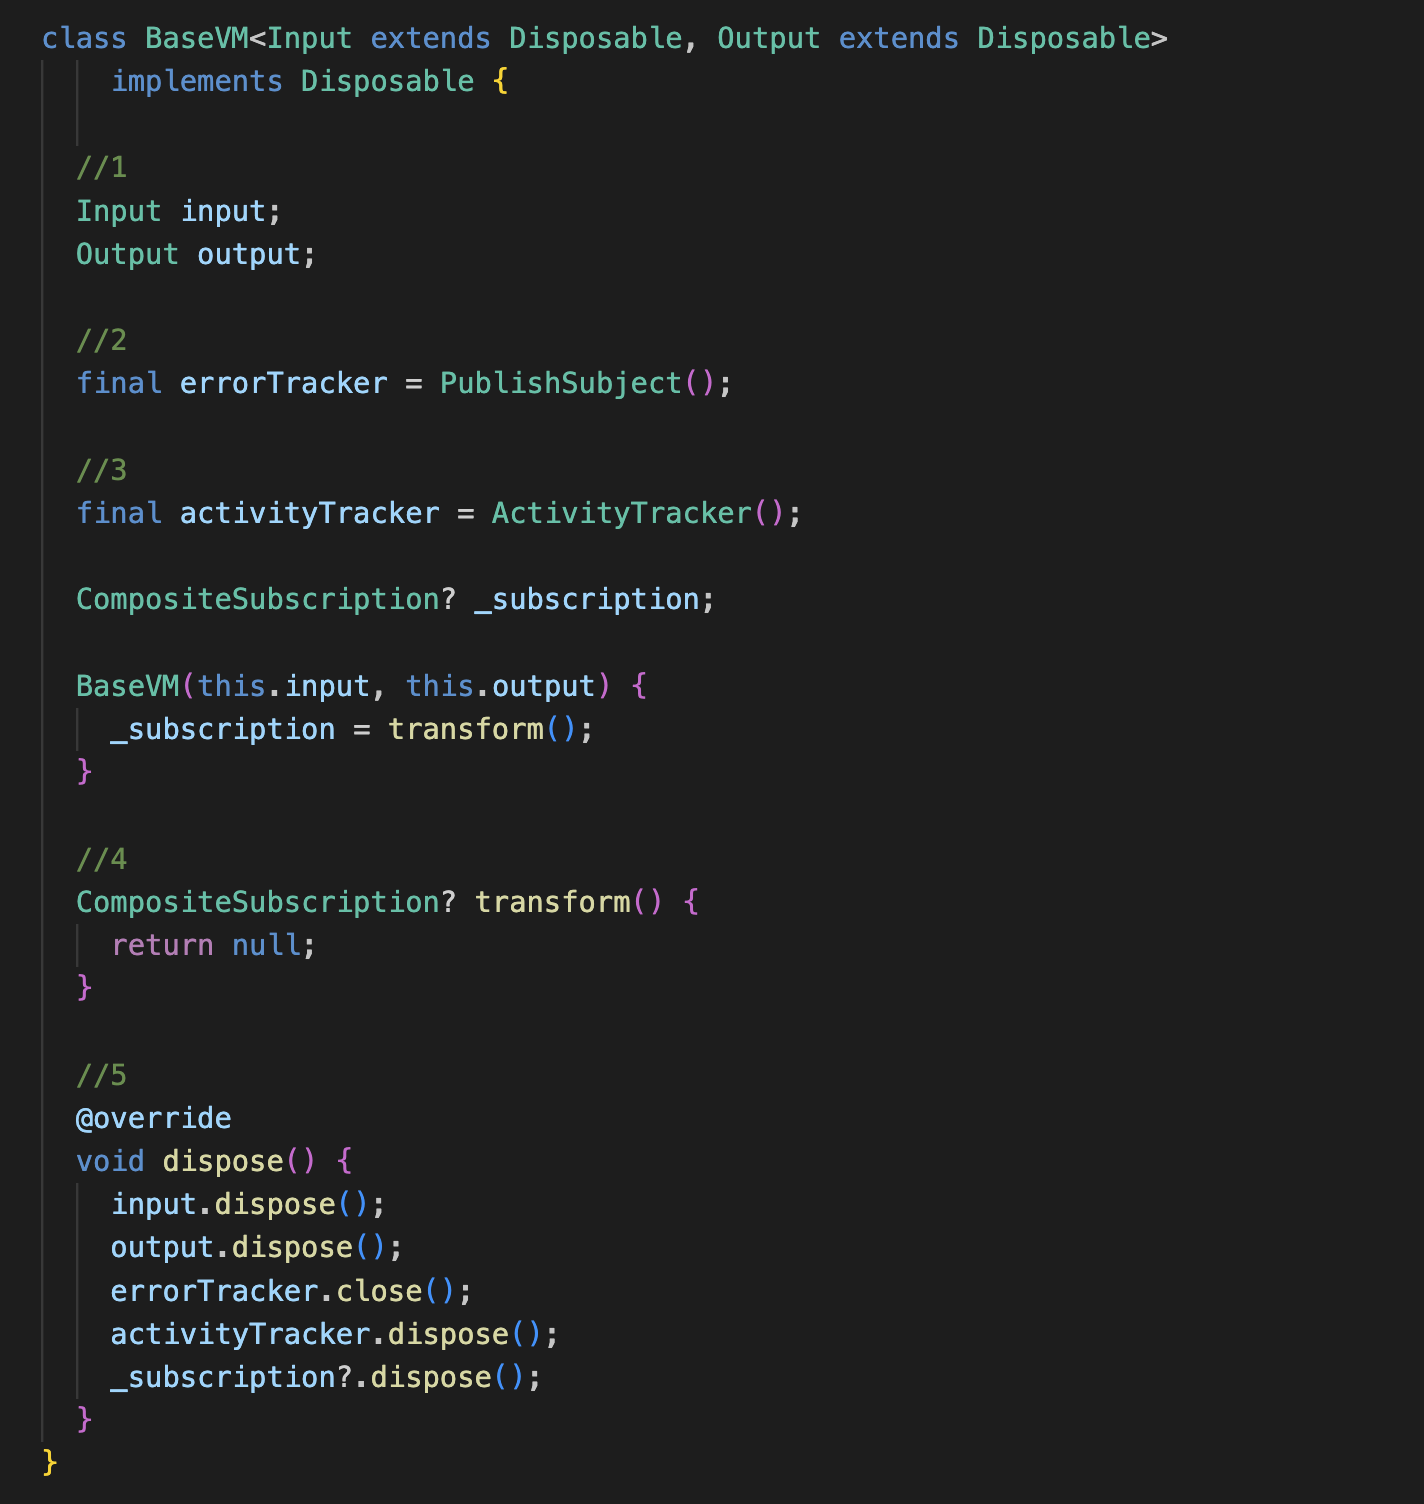
Take a look at the code above. Our base view model is a generic class that defines the following:
- An input and an output, both of which are Disposable, so that we can later dispose of all the resources.
- ErrorTracker is a subject that keeps track of any exceptions that may occur during the transformation logic.
- ActivityTracker is a custom class that keeps track of the execution status of the entire transformation logic. We will discuss this in more detail later in this blog.
- The transform method is the heart of our view model, where we put all the transformation logic. This is the only method that subclasses need to override. The return value of the transform method is a subscription. But what is a subscription? A subscription is an instance that keeps our view model alive. If you think of the view model as a CPU, you can think of the subscription as the power supply. When you dispose of the subscription, it means you turn off the power of the CPU, and consequently, your view model and all its associated resources will be disposed of as well.
- Because the view model itself implements Disposable, it also has the disposal method where we dispose of everything. This method should be called inside the disposal method of the widget.
Now, let’s consider a specific example to better understand how we can implement a view model. Imagine we have a login screen with username and password fields.
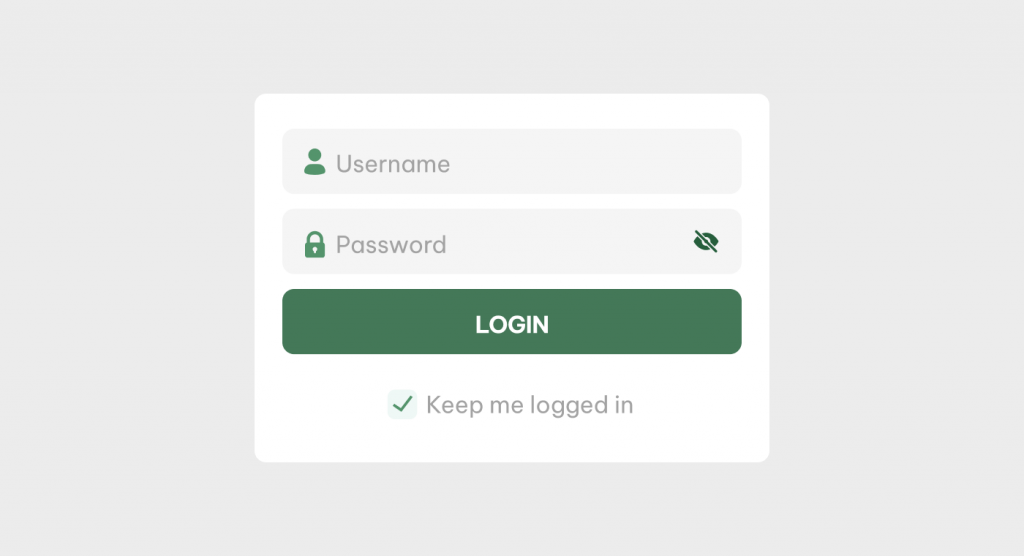
Firstly, we need to identify the input and output.
Input:
- The username and password that the user enters
Output:
- User Credential: If the user login is successful
- Authentication Error: If the user login fails for any reason
- Loading Status: This describes whether the authentication process is currently executing or not
The code
Now that we know exactly what data we have and what data we need, let’s start writing some code.
Let’s define the login info:

Then we define the input with the above info:
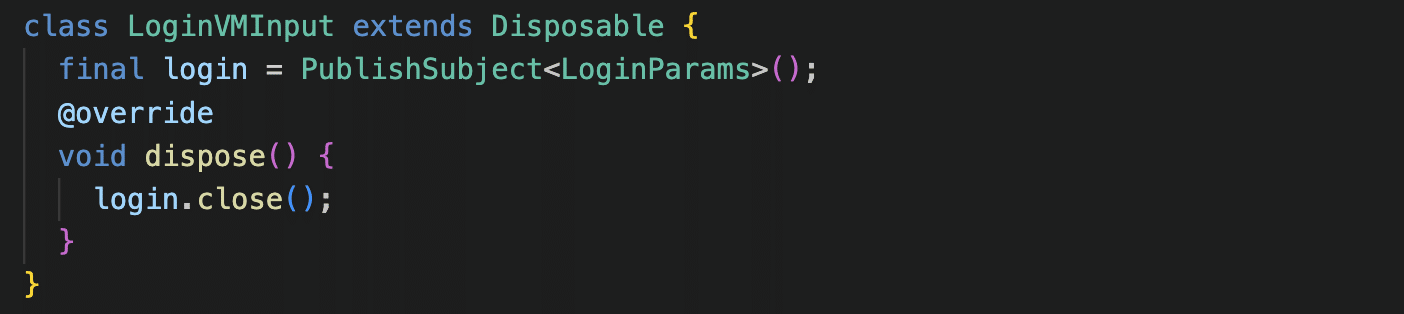
You can see that our input has a login subject that takes elements of the type LoginParams. Each time the user taps on the login button, we will add the username and password to this subject. Since the subject is also a stream, we can use all the Rx operators on it.
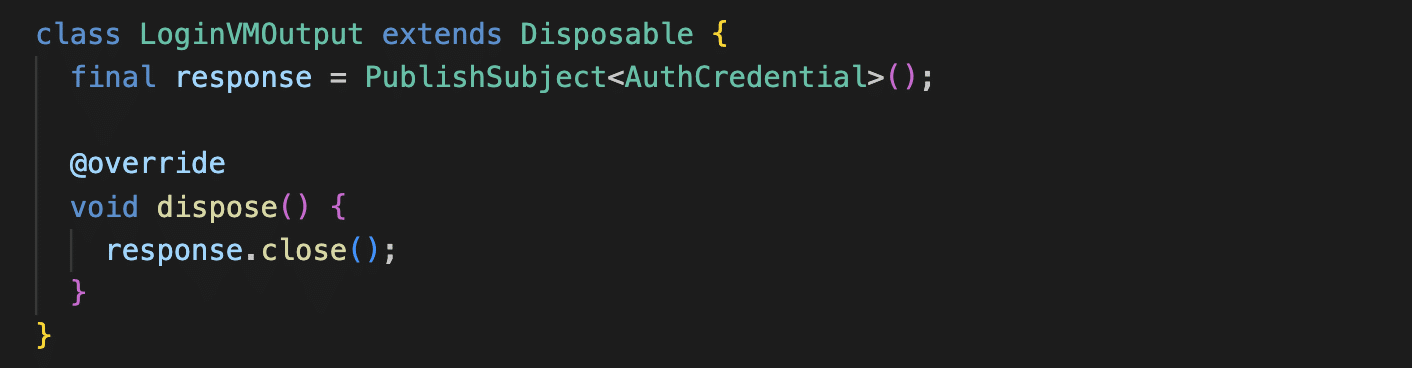
Similarly, the output should be implemented as follows:
And the last thing we need to do is override the transform method:
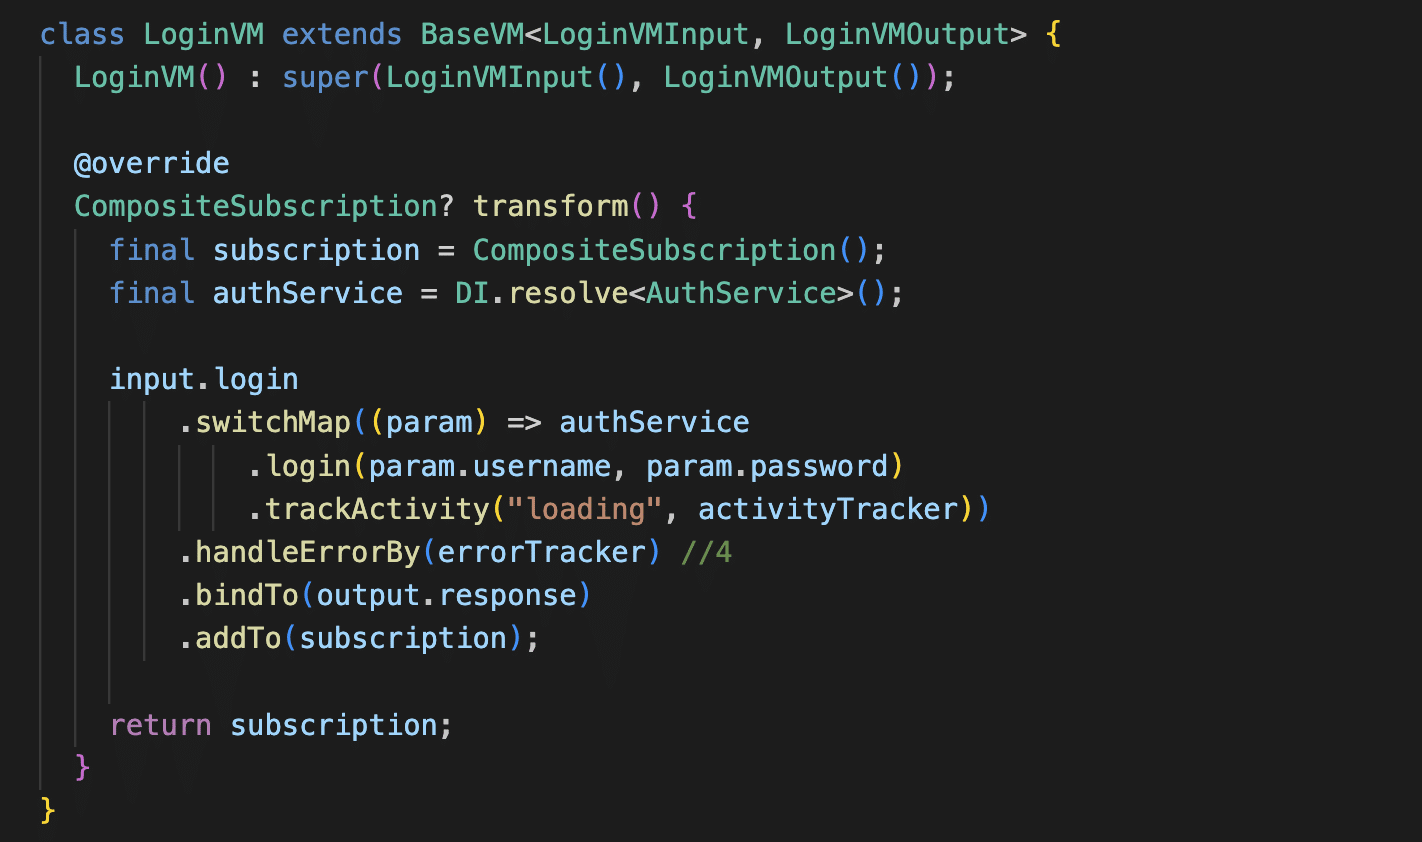
So, what happened here? You might notice some Rx operators being used (This is not a blog about reactive programming or RxDart, so we won’t go into detail about the Rx operators. We will discuss this in some upcoming blogs). Basically, it’s a flow of data transformation. We take the login params from the input, and then we call a login API with those params. Finally, we put the result (user credentials) into the output. Any exceptions that occur will be put into the errorTracker, and the execution status will be put into the activityTracker.
Just like that, you can implement any other business logic in the same way.
If you pay attention, we can easily define the inputs and outputs just based on a wireframe or by imagining what the UI looks like without writing any lines of code. Another thing to note is that we haven’t done anything with the UI components yet. However, our business logic is already implemented and ready for testing.
At zen8labs, we realize that when implementing new functionality, starting with writing and testing the logic first is much more efficient compared to starting with the UI. That’s why we love this approach.
The last thing we need to do is to connect our VM to a View (Widget), just as simple as this.
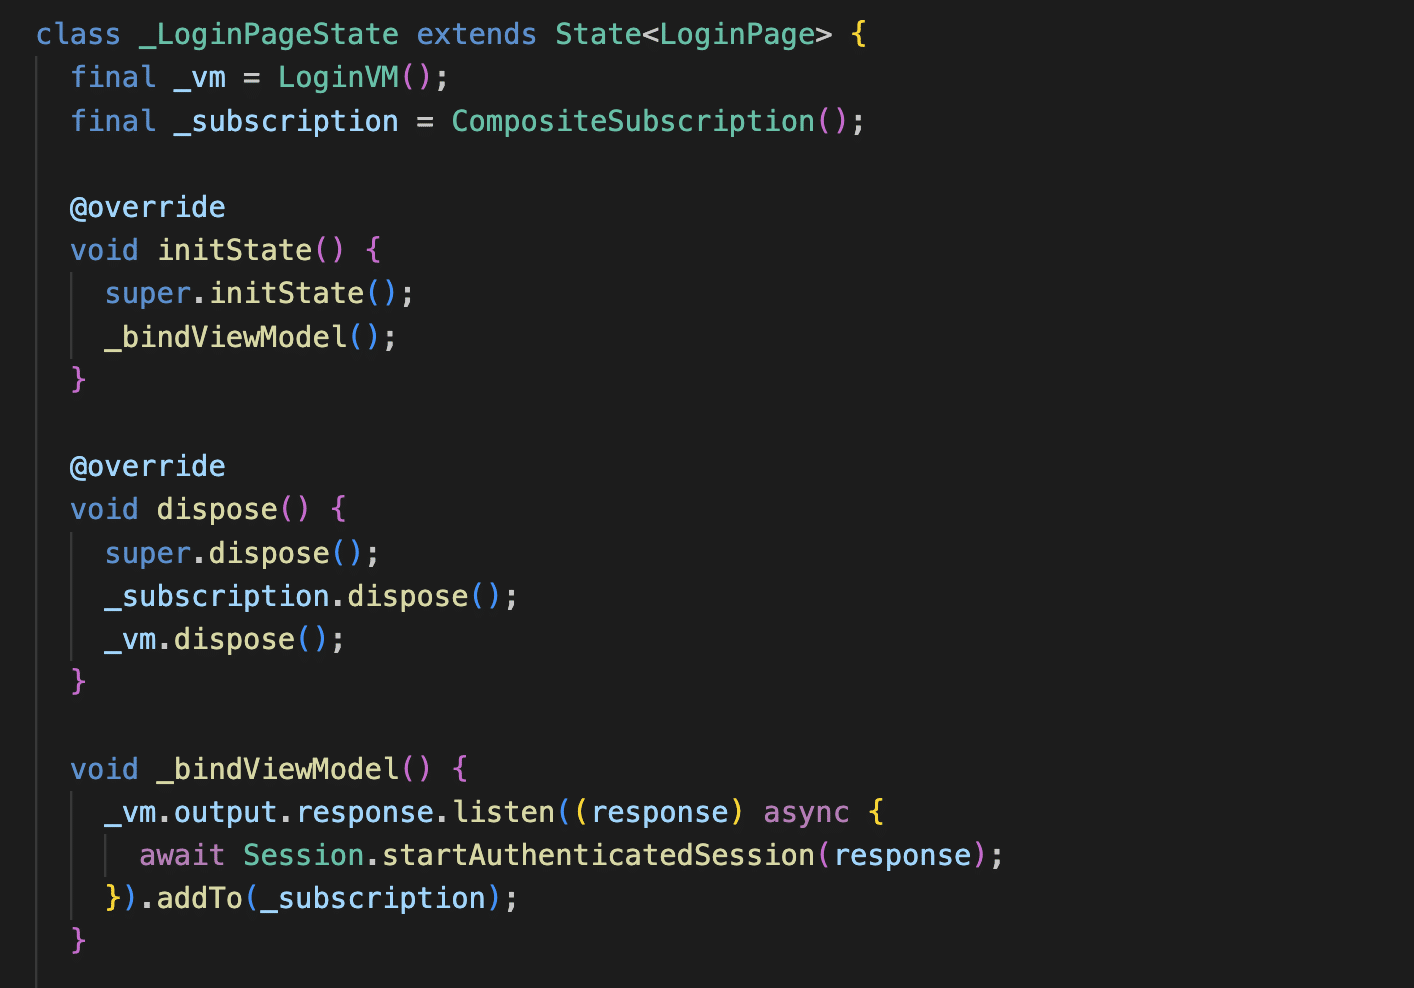
That’s it! Our widget only contains code for constructing and composing the UI. Nothing more!
How about error handling?
In traditional approaches, we use a lot of try-catch blocks and null-checking logic. However, with the power of reactive programming, we can eliminate the need for these. In the example above, you may notice the errorTracker instance, which is essentially a Subject that emits exceptions as elements. We simply forward any exceptions that occur in our business logic to this Subject. Then, we only need to listen to this Subject to handle all upcoming exceptions. There are no try-catch blocks in our code, and we have a single place for handling all exceptions. Pretty cool, right?
ActivityTracker
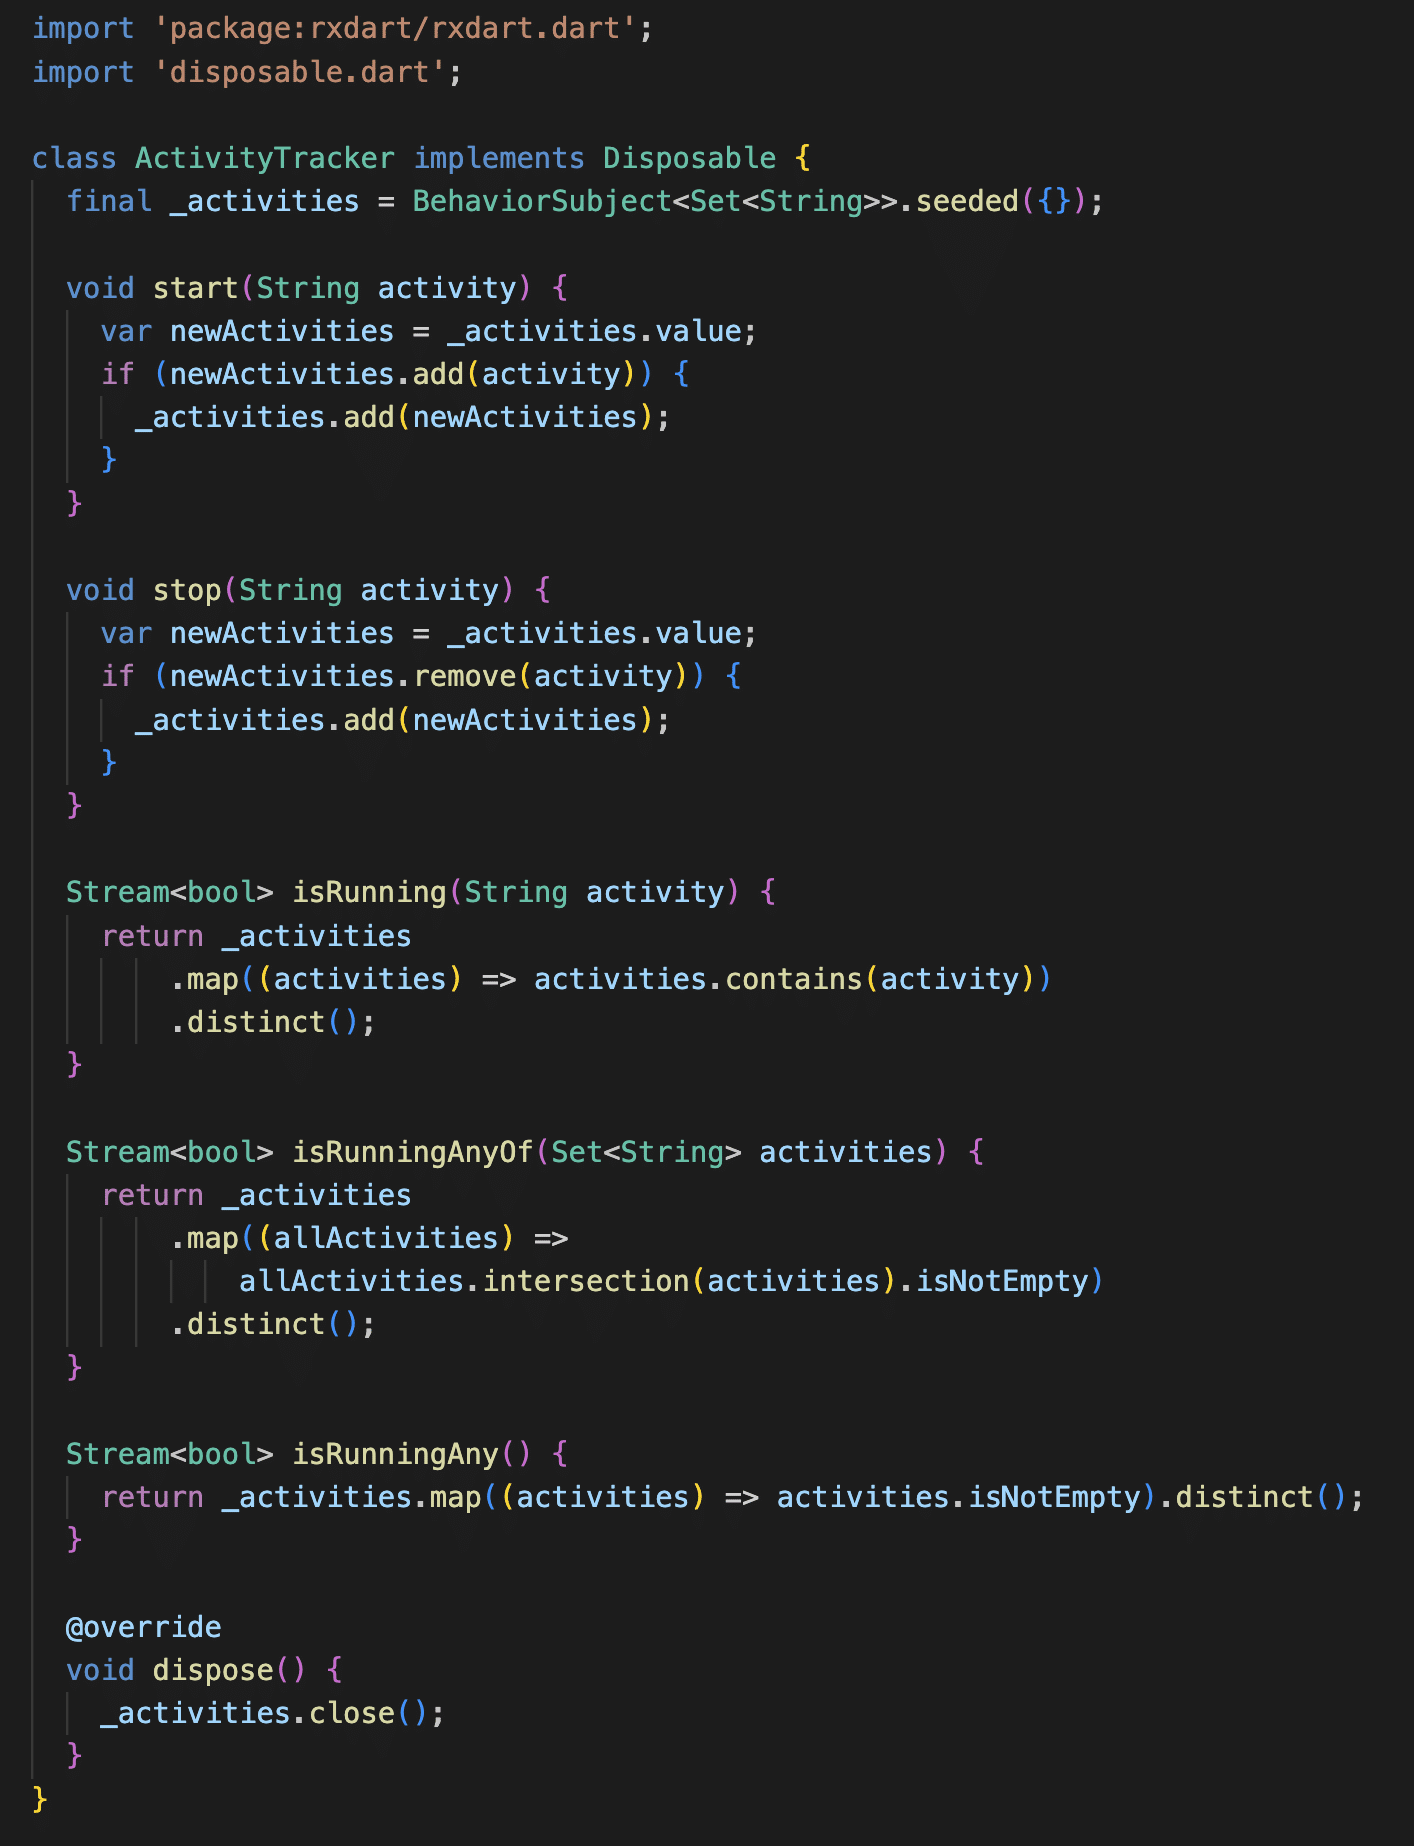
Most of the logic will involve some asynchronous tasks, and a common use case is to show a loading indicator to indicate that something is happening. Similar to error handling, the issue with traditional approaches is that we end up with many places where we have to show and hide the loading indicator, especially when dealing with complex combinations of asynchronous tasks. To address this issue, we can implement an ActivityTracker class like this:
And we can write an extension on the Stream class to track the execution status using the ActivityTracker.
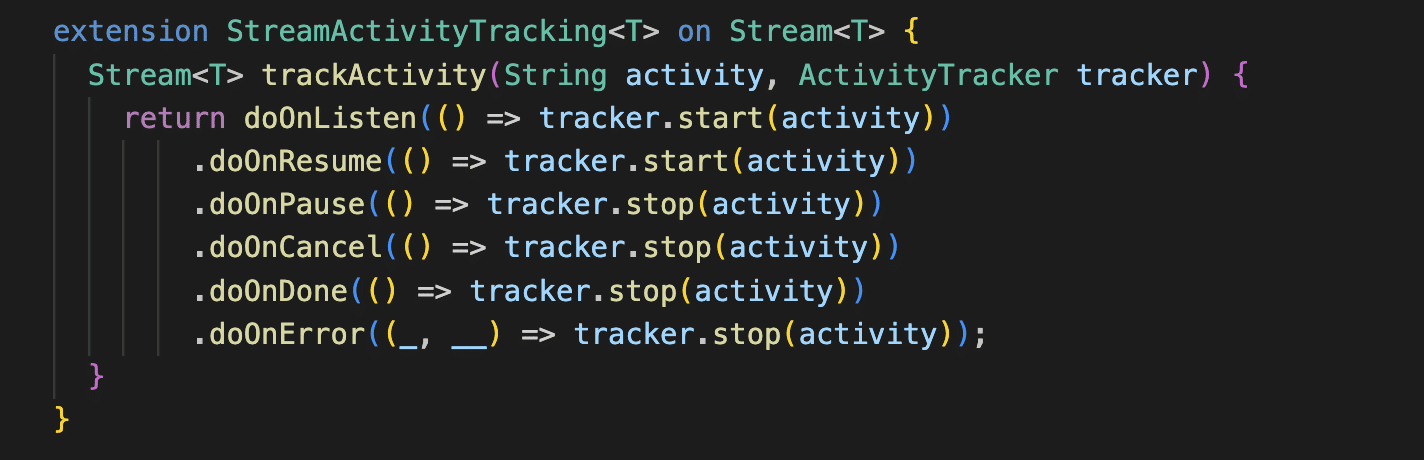
Basically, any stream is a task that needs to be executed, and we label that execution as an activity (string). When the stream is started or resumed, we mark that activity as true. Similarly, when the stream is canceled, completed, encounters an error, or is paused, we toggle it back to false.
With the ActivityTracker, we can have a single boolean stream that presents the status of any number of activities.
The conclusion
At zen8labs, we have built MVVM + Rx for all mobile platforms and have successfully used it in numerous large-scale projects without encountering any issues. As a result, we believe that BloC, Redux, and other design patterns are effective. However, we also see the potential of MVVM + Rx in Flutter and believe it is worth considering.
Interest in other blog posts? Find them here
Toan Nguyen, Head of Mobile